Get a date part from a datetime type value in MS SQL Server.

Girl fuck Microsoft

Fuck  Microsoft, don’t know why they make this job “get the date/month/year part from a datime value” become so complicate. In MySQL just use Date(datetime_value) but here we go with Microsoft SQL (work with SQL 2008 and higher)

CONVERT(VARCHAR(10),DATE_TIME_VALUE,111)

For example, get the today date from field PostTime has data type datetime you should go:

SELECT * FROM DB_NAME WHERE Convert(Varchar(10), PostTime,111)=’2015/04/07′

This is working method, there is another way with DATEADD(), DATEDIFF() and people said that method give better performance but I don’t want to give a fuck, I wan’t something sort and work.

Finally, fuck Microsoft as usual!

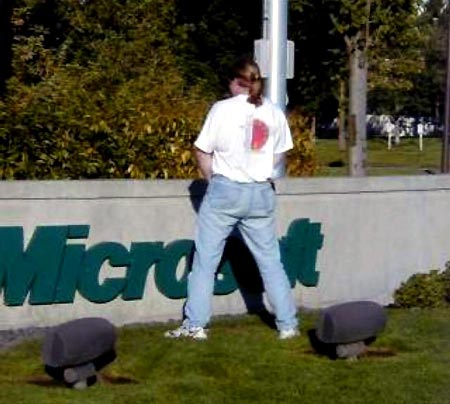
Pee on Microsoft sign

Đổi SATA HDD mode từ IDE sang AHCI hay RAID và ngược lại sau khi install Windows

Cơ sự là lắm khi cài Windows nhắm mắt nhắm mũi chả check BIOS, SATA Hard disk đang được đặt là IDE thay vì AHCI. Cài xong  mà đổi khởi động thì Windows nó crash cái rụp. Thuốc đây:

– Để SATA mode là IDE trong BIOS như lúc cài

– Khởi động vào Windows, chạy Regedit (làm thế nào để chạy thì đừng hỏi, không biết chạy thì đừng nghịch cái này, nhá!)
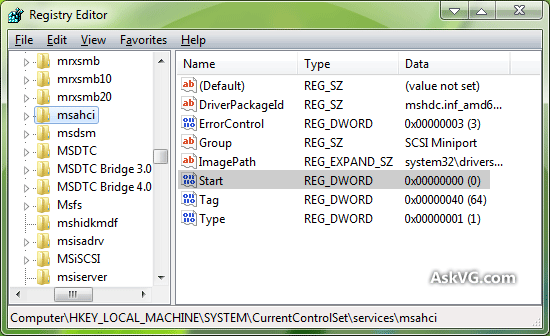
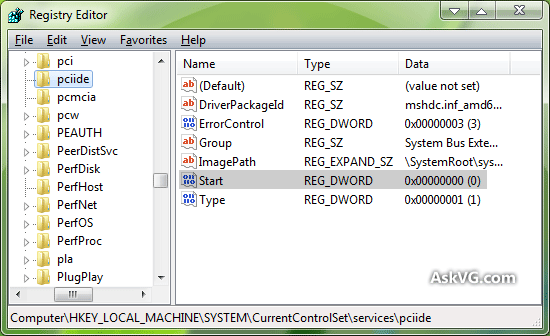
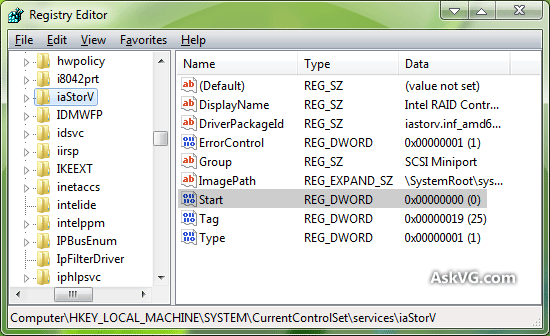
– Tìm đến HKEY_LOCAL_MACHINE\SYSTEM\CurrentControlSet\services\msahci và HKEY_LOCAL_MACHINE\SYSTEM\CurrentControlSet\services\pciide (Nếu đặt là RAID thì tìm đến HKEY_LOCAL_MACHINE\SYSTEM\CurrentControlSet\services\iaStorV )

– Tìm mục Start trong 2 Key này và sửa giá trị DWORD của nó thành 0 (xem hình)

Reset AHCI setting

Reset IDE setting

Reset RAID setting

– Sau khi đặt về 0 rồi thì restart lại máy, vào BIOS, chuyển thiết lập của ổ SATA sang chế độ tương ứng (AHCI, IDE hay RAID)
– Khởi động vào Windows, Windows sẽ tự cài driver tương ứng.

CÁCH 2: Dùng Safe mode Boot

– Chạy msconfig, vào tab Boot, chọn mục Safe boot
– Khởi động lại máy, vào BIOS, đổi setting từ IDE sang AHCI, cho máy khởi động tiếp
– Windows sẽ tự nhận driver để cài
– Chạy lại msconfig, bỏ đánh dấu mục Safe Boot, khởi động lại là được

Install MS Securitty Essential on Windows 8, Windows 2012

Anh Satya Nadella chả biết định thế nào mà cái Security Essential trông cũng xinh đẹp nhẹ nhàng nay anh cấm nó cài với Windows 8 và 2012 Server, mẹo đơi:

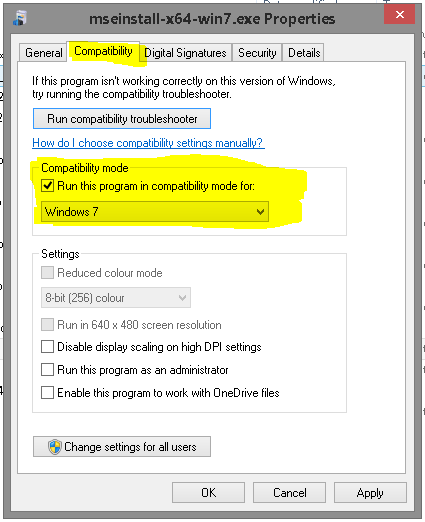
– nhấn phải lên cái file cài đặt, chọn Properties, click tab Compatibility (xem hình)

Compatibility setting

– Nhấn OK quay ra

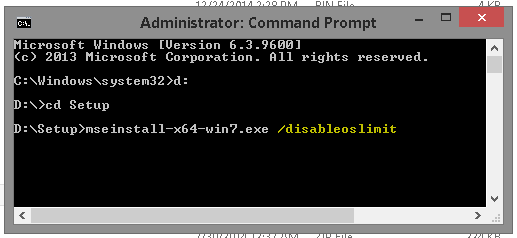
– Mở command line (đừng hỏi làm cách nào), chuyển đến folder chứa cái file cài đặt kia, gõ cái tên file cài đặt với tham số /disableoslimit gõ Enter. Thế là xong con ong! Hưởng đi các cô!

run comand line ưith parameter

Ngớ ngẩn!

Ngớ ngẩn là quên mất cái MIME, attach size + MIME nữa thì message size nó to thêm ~ gần 1 nửa của cái file attach (cái này có thể thay đổi theo định dạng của file attach, hơi đâu đi nghiên cứu cái MIME làm giề). Túm váy lại để attach 20MB phải config cho cái message_size_limit lên 35MB !!!
Test bằng 1 file nén 7z 20,1MB trong toàn PDF. 

Chả có cái file Text nào to to mà test, chế ra 1 em thì lười lắm 😀

Già rồi đâm lẫn cẫn, rất là vớ cmn vẩn!

Active Directory/LDAP Virtual Users for CentOS 6.6

– CentOS 6.6 minimal

– Postfix

– Dovecot

– Virtual mail with Active Directory accounts on Windows 2012 R2 DC

1) Postfix

/etx/postfix/ldap-users.cf

——————————–

[root@centos-01 ~]# cat /etc/postfix/ldap-users.cf

server_host = dc01.my-domain.vn

server_port = 389

search_base = dc=my-domain, dc=vn

version = 3

query_filter = (&(objectclass=person)(mail=%s))

result_attribute = sAMAccountName

result_format = %s/Maildir/

bind = yes

#bind_dn = cn=mail_bind_user, dc=my-domain, dc=vn

bind_dn = mail_bind_user@my-domain.vn

bind_pw = mySecRetPassword

scope = sub

expansion_limit = 0

size_limit = 0

[root@centos-01 ~]# 

Adobe CS5 Cleaner Tool

Download Adobe CS5 Cleaner Tool
Reporter: MD. Obaiduzzaman Khan Under: Software On August 31, 2010 
Do you want to remove installed Adobe Creative Suite products such as CS3,CS4 and CS5? Than you need Adobe CS5 cleaner tool it runs with both Windows and Mac….
Changed your mind and want to remove installed Adobe Creative Suite products (CS3, CS4 and CS5)? Or sometimes when you find corrupted installation / error installing Adobe CS3/4/5 and want to re-install it back? Re-installing Adobe Creative Suite Product needs you to firstly uninstall/remove the previously installed (that corrupted/error). But what if you can’t find the Uninstall / Remove entries? Then Adobe CS5 Cleaner Tool will help you remove installed Adobe CS products and is compatible to uninstall Adobe CS3, CS 4, and CS5. The Adobe CS5 Cleaner Tool resolves installation problems for Adobe Creative Suite 5, Adobe Creative Suite 4, and Adobe Creative Suite 3 software and works on any final RTM version of Adobe software too.
Whatever its version, Adobe CS5 Cleaner Tool will uninstall pre-release or beta version of Adobe CS3, Adobe CS4 or Adobe CS5 suites (e.g. Master Collection, Design Standard, Design Premium, Production Premium, Web Standard and Web Premium) or applications (e.g. Photoshop, Premiere Pro, Illustrator, InDesign, Dreamweaver, Fireworks, After Effects, Contribute, etc.)
Verify Adobe CS5 Cleaner Tool:
1- Navigate to one of the following folders:
• Mac OS: /Users/[Username]/
• Windows XP: C:\Documents and Settings\[Username]\
• Windows Vista or Windows 7: C:\Users\[Username]\
2- Open the Adobe CS5 Installer Database removal application.log file (Mac OS) or the Adobe CS5 Installer Database removal script.log file (Windows) in a text editor such as WordPad (Windows) or TextEdit (Mac OS).
3- Ensure that there is no error been logged.
Download link :
Windows :WinCS5Cleanupscript.zip .
Mac :MacCS5CleanupUtility.dmg.

Install Windows XP SP2 on MacBook Pro

  • After boot to Windows XP install CD, choose to format BOOTCAMP Partition as NTFS or it won’t boot in future due to limitation of FAT32 arcording to partition size.

Update:

BootCamp Control panel applet doesn’t show up if view Control Panel in Classic mode, must be menu/task view mode

Copy installation of BootCamp (\Drivers\Apple) to local hardisk then install to prevent crash while installing (caused sometime by some drives) to fix this.

Use rsync to synchronize directories/backup

rsync -rtvlz –progress –size-only /home/    /media/usb_disk/home/back_up/


-r copies also all subdirectories within main directory
-t preserves modification times
-v verbose mode, shows more information
-l copies symbolic links
-z compresses files for faster transfer
–progress shows progress during transfer
–size-only compare files based on their size instead of hashes (less CPU, so faster)